Old fashioned ice cream makers are a fantastic way to make delicious homemade ice cream, offering a nostalgic experience and a tasty treat. At mens-fashion.net, we’ll guide you through everything you need to know about these machines, from how they work to the best recipes to try. Making your own ice cream at home allows for creativity and customization, ensuring you get the perfect frozen dessert every time. Dive in to explore the world of vintage ice cream making, learn about classic recipes, and find out how to make the best homemade ice cream.
Table of Contents:
- 1. Understanding Old Fashioned Ice Cream Makers
- 1.1 Hand Crank vs. Electric Models
- 1.2 The Science Behind Freezing
- 1.3 Essential Accessories
- 2. Step-by-Step Guide to Making Ice Cream
- 2.1 Preparing Your Mixture
- 2.2 Assembling the Ice Cream Maker
- 2.3 The Freezing Process: A Detailed Walkthrough
- 3. Tips and Tricks for Perfect Ice Cream
- 3.1 Achieving the Right Consistency
- 3.2 Common Mistakes to Avoid
- 3.3 Storing Your Homemade Ice Cream
- 4. Delicious Old Fashioned Ice Cream Recipes
- 4.1 Classic Vanilla Ice Cream
- 4.2 Strawberry Ice Cream
- 4.3 Peach Ice Cream
- 4.4 Banana Ice Cream
- 5. Choosing the Right Ice Cream Maker
- 5.1 Size and Capacity
- 5.2 Noise Levels
- 5.3 Electric vs. Hand Crank
- 6. The Nostalgic Appeal of Old Fashioned Ice Cream Makers
- 6.1 A Trip Down Memory Lane
- 6.2 Creating Family Traditions
- 6.3 The Joy of Homemade Treats
- 7. Modern Twists on Classic Ice Cream
- 7.1 Adding Unique Flavors
- 7.2 Incorporating Mix-Ins
- 7.3 Vegan and Dairy-Free Options
- 8. Troubleshooting Your Ice Cream Maker
- 8.1 Motor Issues
- 8.2 Freezing Problems
- 8.3 Canister Leaks
- 9. Maintaining Your Ice Cream Maker
- 9.1 Cleaning Tips
- 9.2 Storage Solutions
- 9.3 Extending the Life of Your Machine
- 10. Frequently Asked Questions (FAQs)
1. Understanding Old Fashioned Ice Cream Makers
What exactly are old fashioned ice cream makers, and why are they still popular? Old fashioned ice cream makers are devices used to make ice cream at home, typically consisting of a canister, a churn paddle, and a bucket filled with ice and rock salt. Their enduring popularity comes from their ability to create creamy, delicious ice cream with a nostalgic touch. According to “The Oxford Companion to Sugar and Sweets,” homemade ice cream offers a unique texture and flavor compared to store-bought versions, making it a sought-after treat for many.
1.1 Hand Crank vs. Electric Models
What are the main differences between hand crank and electric ice cream makers? The main differences lie in the method of churning: hand crank models require manual labor, while electric models automate the process. Hand crank ice cream makers provide a more traditional, hands-on experience, perfect for those who enjoy a bit of physical activity. Electric ice cream makers, on the other hand, offer convenience and consistency, ideal for busy individuals. According to product reviews on websites like Good Housekeeping, electric models are generally preferred for their ease of use and consistent results.
1.2 The Science Behind Freezing
How does an old fashioned ice cream maker actually freeze the ice cream mixture? The ice cream maker freezes the mixture through a process called freezing point depression. The combination of ice and rock salt lowers the freezing point of water, creating a super-cooled environment around the canister. As the churn paddle rotates, it scrapes the frozen ice cream from the walls of the canister, incorporating air and preventing the formation of large ice crystals. This results in a smooth, creamy texture. A study published in the “Journal of Food Science” highlights the importance of proper salt-to-ice ratios for optimal freezing.
1.3 Essential Accessories
What accessories are essential for using an old fashioned ice cream maker? Essential accessories include rock salt, crushed ice, an electric mixer (optional, but recommended), and serving utensils. Rock salt is crucial for lowering the freezing point, while crushed ice provides the necessary cooling. An electric mixer helps prepare the ice cream base, ensuring all ingredients are well combined. Serving utensils, such as ice cream scoops and bowls, complete the experience. Online retailers like Amazon offer a variety of ice cream making kits that include these essential items.
2. Step-by-Step Guide to Making Ice Cream
How do you make ice cream with an old fashioned ice cream maker? Making ice cream involves preparing the mixture, assembling the ice cream maker, and initiating the freezing process. Follow these steps for the best results.
2.1 Preparing Your Mixture
How do you prepare the ice cream mixture before freezing? To prepare the mixture, combine your chosen ingredients (cream, milk, sugar, flavorings) in a bowl and mix thoroughly. Using an electric mixer or blender can help ensure a smooth, consistent base. For richer ice cream, consider using a higher ratio of cream to milk. Many chefs recommend chilling the mixture for at least 30 minutes before freezing to enhance the flavor and texture.
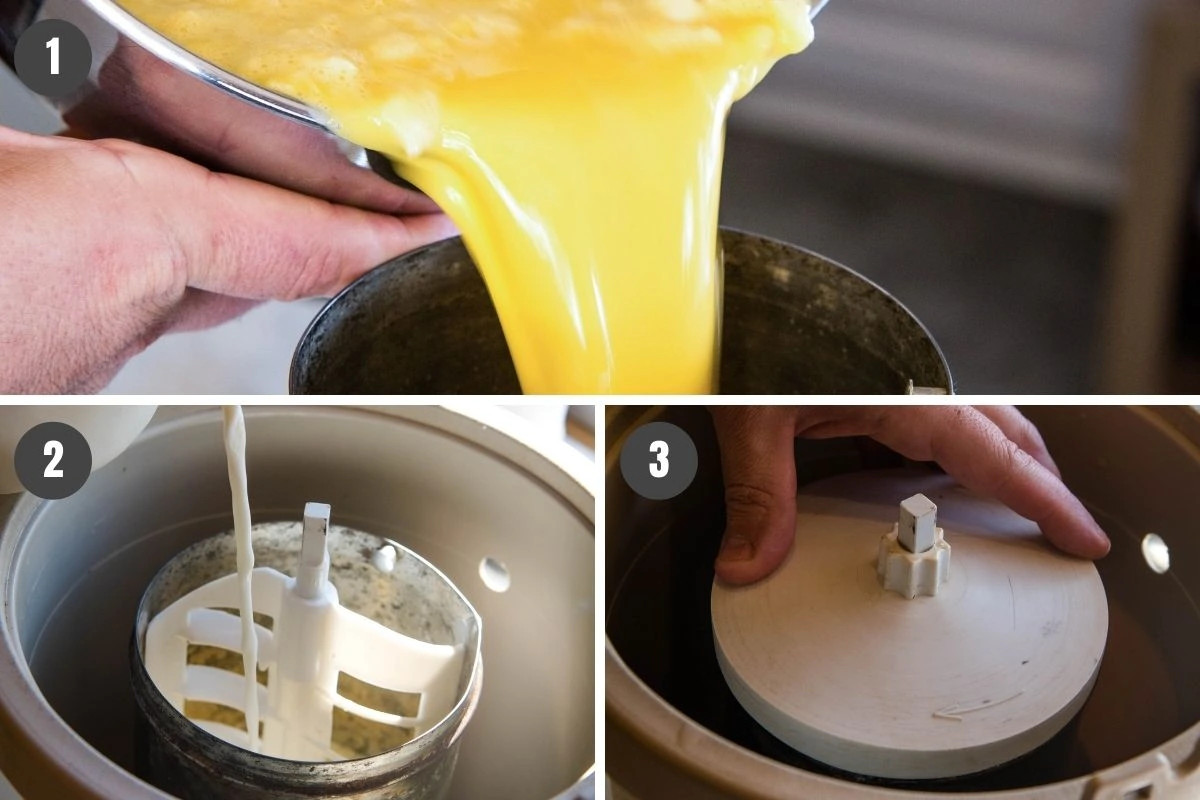
2.2 Assembling the Ice Cream Maker
What is the correct way to assemble an old fashioned ice cream maker? First, ensure the canister and churn paddle are clean. Place the churn paddle inside the canister, then pour the ice cream mixture into the canister, leaving enough room for expansion. Secure the lid tightly. Place the canister inside the bucket of the ice cream maker and attach the motor or hand crank mechanism. The assembly should be snug and secure to ensure efficient churning.
2.3 The Freezing Process: A Detailed Walkthrough
What are the detailed steps for freezing the ice cream? Start by layering crushed ice around the canister, followed by rock salt. Alternate layers of ice and salt, ensuring the mixture is fully surrounded. If using an electric model, plug it in and let it churn. If using a hand crank, begin turning the crank at a steady pace. Monitor the motor or the resistance of the crank; as the ice cream freezes, it will become harder to turn. The process typically takes 30-45 minutes, depending on the recipe and the ambient temperature. As recommended by food experts, adding more ice and salt as needed will maintain the freezing temperature.
3. Tips and Tricks for Perfect Ice Cream
What tips and tricks can help you achieve the perfect ice cream consistency and flavor? Achieving perfect ice cream involves understanding the nuances of the process and avoiding common pitfalls. Here are some tips to help you succeed.
3.1 Achieving the Right Consistency
How do you ensure your ice cream has the right consistency? The right consistency is achieved by using the correct ratio of ingredients, pre-chilling the mixture, and maintaining the proper ice-to-salt ratio during freezing. Overchurning can result in a grainy texture, while underchurning can leave the ice cream too soft. Monitoring the motor or hand crank resistance is key to knowing when the ice cream is ready. According to ice cream making guides, the ideal consistency is similar to soft-serve when it comes out of the machine.
3.2 Common Mistakes to Avoid
What are some common mistakes to avoid when making ice cream? Common mistakes include using too much sugar, which can prevent proper freezing; not chilling the mixture beforehand, which can result in larger ice crystals; and using an incorrect ice-to-salt ratio, which can affect the freezing temperature. Always follow the recipe closely and adjust ingredients to taste after the first batch. Another frequent error is overfilling the canister, which can cause overflow and uneven freezing.
3.3 Storing Your Homemade Ice Cream
What is the best way to store homemade ice cream? Store homemade ice cream in an airtight container in the freezer to prevent freezer burn and maintain its creamy texture. Press a piece of plastic wrap directly onto the surface of the ice cream before sealing the container to further protect it. Homemade ice cream is best consumed within one to two weeks for optimal flavor and texture. Food safety experts recommend keeping your freezer at 0°F (-18°C) for the best preservation.
4. Delicious Old Fashioned Ice Cream Recipes
What are some classic old fashioned ice cream recipes that you can try at home? Classic recipes like vanilla, strawberry, peach, and banana are perennial favorites for old fashioned ice cream makers.
4.1 Classic Vanilla Ice Cream
What are the ingredients and steps for making classic vanilla ice cream? Ingredients include:
- 2 cups heavy cream
- 1 cup whole milk
- ¾ cup granulated sugar
- 1 vanilla bean, split and scraped (or 2 teaspoons vanilla extract)
Steps:
- Combine cream, milk, and sugar in a saucepan. Heat gently until sugar is dissolved.
- Add vanilla bean and simmer for 10 minutes. Remove vanilla bean and let cool.
- Chill mixture for at least 4 hours.
- Pour into ice cream maker and churn according to manufacturer’s instructions.
Many chefs note that using high-quality vanilla extract or fresh vanilla beans significantly enhances the flavor.
4.2 Strawberry Ice Cream
How do you make delicious strawberry ice cream with an old fashioned ice cream maker? Ingredients include:
- 2 cups fresh strawberries, hulled and sliced
- ¾ cup granulated sugar
- 1 tablespoon lemon juice
- 2 cups heavy cream
- 1 cup whole milk
Steps:
- Combine strawberries, sugar, and lemon juice in a bowl. Let macerate for 30 minutes.
- Puree strawberry mixture in a blender.
- Combine strawberry puree, cream, and milk in a bowl.
- Chill mixture for at least 4 hours.
- Pour into ice cream maker and churn according to manufacturer’s instructions.
For best results, use ripe, in-season strawberries to maximize flavor.
4.3 Peach Ice Cream
What is the recipe for homemade peach ice cream? Ingredients include:
- 2 cups fresh peaches, peeled and sliced
- ¾ cup granulated sugar
- 1 tablespoon lemon juice
- 2 cups heavy cream
- 1 cup whole milk
Steps:
- Combine peaches, sugar, and lemon juice in a bowl. Let macerate for 30 minutes.
- Puree peach mixture in a blender.
- Combine peach puree, cream, and milk in a bowl.
- Chill mixture for at least 4 hours.
- Pour into ice cream maker and churn according to manufacturer’s instructions.
Using slightly firm peaches will prevent the ice cream from becoming too mushy.
4.4 Banana Ice Cream
How can you make banana ice cream using an old fashioned ice cream maker? Ingredients include:
- 3 ripe bananas, mashed
- ¾ cup granulated sugar
- 1 tablespoon lemon juice
- 2 cups heavy cream
- 1 cup whole milk
Steps:
- Combine mashed bananas, sugar, and lemon juice in a bowl.
- Mix in cream and milk until well combined.
- Chill mixture for at least 4 hours.
- Pour into ice cream maker and churn according to manufacturer’s instructions.
For a richer flavor, consider caramelizing the bananas before adding them to the mixture.
5. Choosing the Right Ice Cream Maker
What factors should you consider when choosing an old fashioned ice cream maker? When selecting an ice cream maker, consider size, noise levels, and whether you prefer an electric or hand crank model.
5.1 Size and Capacity
What size ice cream maker is best for your needs? The best size depends on how often you plan to make ice cream and how many people you typically serve. A 1-2 quart model is suitable for small families or occasional use, while a 4-6 quart model is better for larger gatherings or frequent ice cream making. According to product reviews, a 4-quart ice cream maker is a versatile option for most households.
5.2 Noise Levels
How noisy are old fashioned ice cream makers, and what can you do about it? Some ice cream makers, particularly older models, can be quite noisy. Electric models tend to be quieter than hand crank models, but noise levels can vary. Reading product reviews and opting for models with noise-reducing features can help minimize the disturbance.
5.3 Electric vs. Hand Crank
Which type of ice cream maker, electric or hand crank, is better for you? The choice between electric and hand crank depends on your preferences and lifestyle. Hand crank models offer a nostalgic experience and require physical effort, while electric models provide convenience and consistency. If you enjoy a hands-on approach and don’t mind the extra work, a hand crank model might be ideal. If you prefer convenience and ease of use, an electric model is the better choice.
6. The Nostalgic Appeal of Old Fashioned Ice Cream Makers
Why are old fashioned ice cream makers so appealing to many people? Old fashioned ice cream makers evoke a sense of nostalgia, create family traditions, and offer the joy of homemade treats.
6.1 A Trip Down Memory Lane
How do old fashioned ice cream makers connect us to the past? These ice cream makers remind many of childhood summers spent making ice cream with family. The simple, hands-on process brings back fond memories and a sense of tradition. Historians note that ice cream making was a popular social activity in the early 20th century, further contributing to its nostalgic appeal.
6.2 Creating Family Traditions
How can making ice cream with an old fashioned ice cream maker become a family tradition? Making ice cream together can be a fun and engaging activity for families. It provides an opportunity to bond, create memories, and pass down recipes and techniques from one generation to the next.
6.3 The Joy of Homemade Treats
What is the unique joy of making homemade ice cream? Making homemade ice cream allows you to control the ingredients and customize flavors to your liking. The process is rewarding, and the end result is a delicious, fresh treat that can’t be replicated by store-bought versions. Home cooks often express satisfaction in knowing exactly what goes into their food, making homemade ice cream a particularly appealing option.
7. Modern Twists on Classic Ice Cream
How can you add modern twists to classic ice cream recipes? You can add unique flavors, incorporate mix-ins, and explore vegan and dairy-free options to elevate your ice cream making.
7.1 Adding Unique Flavors
What are some unique flavor combinations to try in your ice cream? Consider experimenting with flavors like lavender honey, salted caramel, or spicy chocolate. Adding extracts, spices, or even herbs can create unexpected and delicious combinations. Chefs often recommend using high-quality ingredients and experimenting in small batches to find your perfect flavor profile.
7.2 Incorporating Mix-Ins
What are some creative mix-ins to add to your ice cream? Mix-ins like chopped nuts, cookie pieces, candy, fruit compotes, and chocolate chunks can add texture and flavor to your ice cream. Add mix-ins during the last few minutes of churning to ensure they are evenly distributed without becoming soggy.
7.3 Vegan and Dairy-Free Options
How can you make vegan or dairy-free ice cream with an old fashioned ice cream maker? Substitute dairy milk and cream with plant-based alternatives like coconut milk, almond milk, or cashew cream. Use vegan sugar and flavorings to create delicious dairy-free ice cream. Many vegan chefs recommend using a combination of plant-based milks to achieve the desired creaminess and texture.
8. Troubleshooting Your Ice Cream Maker
What should you do if you encounter problems with your ice cream maker? Common issues include motor problems, freezing difficulties, and canister leaks.
8.1 Motor Issues
What should you do if your electric ice cream maker’s motor stops working? First, ensure the motor is properly connected and plugged in. Check for any obstructions that might be preventing the churn paddle from turning. If the motor is overheating, allow it to cool down before attempting to use it again. If the problem persists, consult the manufacturer’s instructions or contact customer support.
8.2 Freezing Problems
What can you do if your ice cream isn’t freezing properly? Ensure you are using the correct ice-to-salt ratio and that the ice is packed tightly around the canister. Adding more salt can help lower the freezing point. Also, make sure the ice cream mixture is properly chilled before churning. If the ambient temperature is too warm, the ice cream may take longer to freeze or not freeze at all.
8.3 Canister Leaks
What should you do if your ice cream maker canister is leaking? Inspect the canister for any cracks or damage. If the leak is minor, you may be able to seal it with food-grade silicone. However, if the damage is significant, it’s best to replace the canister to prevent further issues.
9. Maintaining Your Ice Cream Maker
How do you properly maintain your old fashioned ice cream maker to ensure its longevity? Proper maintenance includes cleaning, storage, and regular inspection.
9.1 Cleaning Tips
What are the best ways to clean your ice cream maker? Disassemble the ice cream maker after each use and wash all parts with warm, soapy water. Avoid using abrasive cleaners or scouring pads, which can damage the canister and other components. Ensure all parts are completely dry before reassembling and storing.
9.2 Storage Solutions
How should you store your ice cream maker when it’s not in use? Store the ice cream maker in a cool, dry place to prevent rust and corrosion. Keep all parts together in a storage container to avoid losing any pieces. If possible, store the canister separately to allow for proper air circulation.
9.3 Extending the Life of Your Machine
What steps can you take to extend the life of your ice cream maker? Regularly inspect the motor and other components for wear and tear. Lubricate moving parts as needed. Avoid overfilling the canister or overloading the motor. Following these steps can help ensure your ice cream maker lasts for many years.
10. Frequently Asked Questions (FAQs)
Q1: What is the ideal ratio of ice to rock salt for making ice cream?
The ideal ratio is typically 3 parts ice to 1 part rock salt, but this can vary depending on the specific ice cream maker and recipe.
Q2: Can I use table salt instead of rock salt?
No, table salt is not recommended as it can affect the freezing process and the taste of the ice cream.
Q3: How long should I chill the ice cream mixture before churning?
Chill the mixture for at least 4 hours, or preferably overnight, for best results.
Q4: What is the best way to prevent ice crystals from forming in homemade ice cream?
Use a high-fat content base (cream and milk), chill the mixture thoroughly, and churn the ice cream quickly.
Q5: Can I add alcohol to my ice cream recipe?
Yes, but be cautious as alcohol can lower the freezing point and prevent the ice cream from setting properly. Use sparingly.
Q6: How do I know when the ice cream is done churning?
The ice cream is done when it reaches a soft-serve consistency and the motor starts to strain or the hand crank becomes difficult to turn.
Q7: What can I do if my ice cream is too soft after churning?
Transfer the ice cream to an airtight container and freeze for an additional 1-2 hours to harden.
Q8: Is it safe to eat ice cream directly from the ice cream maker?
Yes, as long as all ingredients are fresh and properly prepared.
Q9: Can I use frozen fruit in my ice cream recipe?
Yes, but thaw the fruit slightly and drain any excess liquid before adding it to the mixture.
Q10: How do I clean the ice cream maker canister if ice cream is stuck to the sides?
Soak the canister in warm water for a few minutes to loosen the ice cream, then wash with soap and water.
Old fashioned ice cream makers provide a delightful way to enjoy homemade ice cream with a touch of nostalgia. Whether you prefer the hands-on experience of a hand crank model or the convenience of an electric version, the tips and recipes shared here will help you create delicious frozen treats for years to come.
For the latest trends and tips on men’s fashion, visit mens-fashion.net and stay ahead of the style curve. Explore our articles, discover your perfect style, and stay updated on the latest fashion trends. Your journey to a more stylish you starts here at mens-fashion.net.
Address: 227 W 27th St, New York, NY 10001, United States
Phone: +1 (212) 217-5800
Website: mens-fashion.net.