The saree, also known as sari, is an iconic and elegant garment from India, celebrated for its versatility and graceful drape. It’s a long piece of unstitched fabric, artistically wrapped around the body in various styles. The nivi style saree is a particularly popular and contemporary draping method favored by many Indian women today. This tutorial will guide you through the process of Fashion Saree Drawing, focusing on a basic yet stylish representation. As you become comfortable with these foundational steps, you can explore your creativity by experimenting with diverse shapes, colors, and patterns to design your own unique saree illustrations.
If you’re ready to embark on this creative journey, gather your drawing tools, and let’s delve into this fashion saree drawing tutorial.
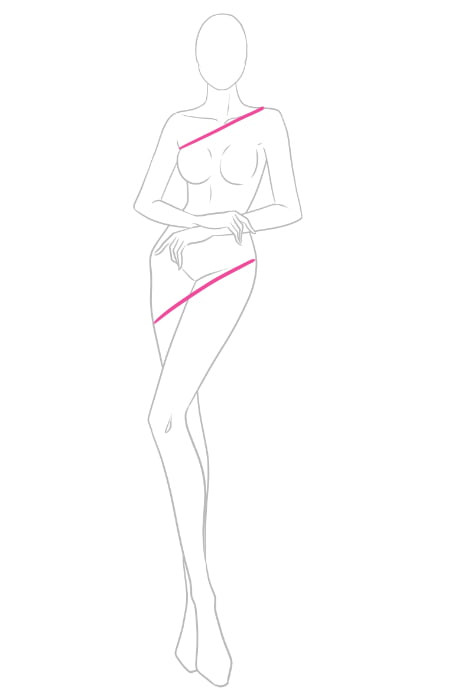
To begin, selecting the right model pose is crucial to showcase your saree design effectively. For an appealing saree sketch, it’s recommended to choose a figure template with feet positioned closely together. Pose the arms either gently resting at the waist or brought forward in front of the body, bent at the elbows for a natural look.
In this guide, we’ll be using figure template #206. Feel free to download it to follow along precisely, or you can use your own fashion figure croquis. You can find numerous tutorials on fashion figure drawing here if you need guidance. Once you have your model pose ready, draw two diagonal lines on the figure. The first line should extend from the armhole upwards to the opposite shoulder, and the second line should cross the model’s hips. These lines will serve as guides for the saree’s initial drape.
Next, create the saree border by drawing a second line parallel to each of the diagonal lines you’ve just drawn. Design the saree border with shapes and motifs of your choice. This is your opportunity to add creative flair. You can opt for identical borders, similar designs, or even completely contrasting patterns for visual interest.
The pallu is the free end of the saree that gracefully hangs from the shoulder. To draw the pallu, start by extending a line downwards from the wrist towards the ground. Erase any part of the border that this line overlaps to ensure a clean drawing. Then, draw another line from the shoulder downwards, closely following the arm’s outline. This will define the flowing shape of the pallu in your fashion saree drawing.
To enhance the realism of your saree drawing, it’s important to depict the end of the pallu as if it’s gently touching the ground. Instead of a straight hemline, draw the hemline with a curve. Notice the diagonal fold that intersects the outer edge of the fabric; this detail adds depth and a three-dimensional quality to your saree fashion sketch.
Now, let’s define the side border of the pallu. This border should be similar in design to the one you created across the hips of the model. However, the key difference is that the direction of the pattern elements should now be vertical, flowing downwards. Maintain a consistent width for this border throughout the entire length of the pallu to ensure a balanced and cohesive design in your fashion saree drawing.
The bottom border, which finishes off the pallu, can be the same size as the other borders. However, it’s often designed to be wider and feature a more elaborate or distinct pattern. Typically, this bottom border extends down to the calves of the figure in your fashion saree drawing.
This particular saree style is characterized by pleats at the center front. The number of pleats can vary, usually ranging from 4 to 8, depending on the desired design. More pleats will naturally result in smaller, finer folds.
To accurately position and center the pleats for this pose, draw two triangular guidelines that converge at the knee. The first triangle should follow the thigh’s contour and end precisely at the knee. The second triangular guideline starts at the knee and extends down to the ground. Ensure that the base of the second triangle is not too wide to maintain the pleats’ defined shape in your fashion saree drawing.
Following the guidelines you’ve just created, add broad pleats to your saree drawing. Pay attention to how the pleats should overlap slightly at the bottom, creating a realistic layered effect. This detail adds depth and dimension to the saree’s drape in your fashion sketch.
The skirt portion of the saree is designed in a fishtail shape. Draw it to be form-fitting from the waist down to the knee, and then allow it to widen and become fuller towards the bottom. It’s important to ensure that the skirt remains positioned underneath the pallu to maintain the correct layering and drape of the saree in your fashion drawing.
Now, let’s draw the saree blouse, also known as the choli. The blouse can be designed with short, medium, or long sleeves, depending on your design preference. Notice that the end of the sleeve is subtly curved; this technique helps create the illusion that the blouse is hugging the arm naturally. In fashion sketches, especially for close-fitting garments, avoid using straight lines as much as possible to achieve a more organic and realistic look.
To further enhance the three-dimensionality of your fashion saree sketch, add folds to the fabric. Begin drawing folds that originate at the waist and extend towards the opposite shoulder and arm. Vary the length and curvature of your lines to avoid a stiff or unrealistic appearance. Adding a few more folds curving around the forearm will subtly hint at the arm’s shape beneath the saree, adding another layer of realism to your drawing.
Once the basic saree drape is sketched, erase any underlying croqui lines that are now covered by the fabric. Now comes the exciting part – designing your own pattern for the saree! Let your creativity flow and choose from abstract shapes, realistic floral motifs, geometric patterns, or any design that inspires you. For guidance on pattern placement in fashion sketches, you might find tutorials like “How to Draw Floral Print” helpful.
Apply your chosen pattern across the entire drape of the saree, except for the large bottom border of the pallu. You can leave this bottom border blank for contrast or create a different, complementary pattern for it to make it stand out in your fashion saree drawing.
Finally, bring your fashion saree drawing to life by adding color! Choose colors that resonate with your design vision. It’s often effective to use a contrasting color for the borders to make them pop. Notice in the example how the large bottom border is rendered in a different color and texture to distinguish it from the rest of the saree design. Select a blouse color that harmonizes well with the saree’s overall color palette to complete your fashion illustration.
We hope this step-by-step tutorial has been easy to follow and has inspired you to explore your creativity in fashion saree drawing, encouraging you to design sarees in a myriad of shapes and colors. Happy drawing and designing your own saree collections!